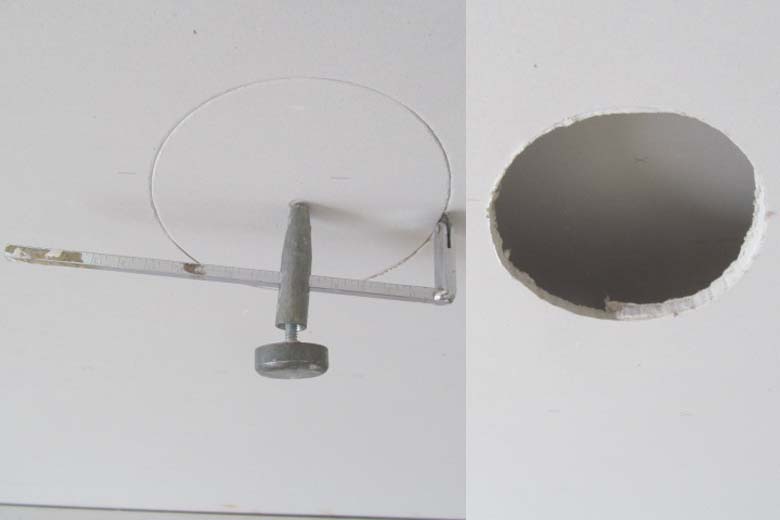
A recessed light hole is an opening in the ceiling designed to hold a recessed light fixture. Recessed light fixtures are installed in the hole, and the hole is then covered with a trim ring. Open light holes can be either round or square.
Recessed lighting is a popular option for lighting up a room, but it can be tricky to install if you’re unfamiliar with it. One of the most challenging aspects of installing recessed lighting is cutting the holes in the drywall to fit the light fixtures.
If you’re not confident in your ability to cut the perfect hole, you can always hire a professional to do it for you. But if you’re determined to do it yourself, here are a few tips to help you get the job done right.
What is a Recessed Hole?
A recessed hole is a hole that is set back or indented from the surface of a material. It is usually created by machining or drilling. Open spots are often used to create a countersink, a hole with a slightly wider diameter at the top than at the bottom. This allows a screw or bolt to be flush with the material’s surface when it is inserted.
Recessed holes can also be used for decorative purposes. They can be created with various shapes and sizes and filled with different materials. For example, an open spot can be filled with a coloured resin to create a gemstone-like effect.
How to Cut Recessed Light Holes in Drywall
Are you tired of your light fixture hanging from the ceiling? Do you want to remove it and put something new in its place? If so, you’re in luck – removing a light fixture is a relatively simple process.
Turn off power to the light fixture.
Turning off the power to a light fixture at the breaker box is simple. Just locate the breaker for the light fixture and switch it off. Be sure to switch it back on when you’re finished using the light.
Remove the light fixture.
Replacing a light fixture is a task that can be done by anyone with a little bit of electrical knowledge. The first step is to remove the light bulb from the spout. Then, loosen the screws that hold the fixture in place. Gently pull the institution down and away from the ceiling.
If the fixture is connected to wires, disconnect the wires by unscrewing the connectors.
Put the light fixture in a safe place until you’re ready to install the new one. Install the new light fixture according to the manufacturer’s instructions. Reconnect the wires to the connectors and screw the connectors in place. Put the light bulb back in the institution and turn on the power. Test the morning to make sure it’s working correctly.
Use a drywall saw
If you’re looking to install a new light fixture in your home, you’ll need to cut a hole in the drywall for it. This can be done with a drywall saw.
To get started, measure the dimensions of the light fixture and draw a template on the drywall. Then, use a drywall saw to cut out the hole. Make sure to cut on the inside of the lines so that the hole is the correct size.
Once the hole is cut, use a drywall saw to cut the drywall around the hole. This will create a smooth edge so that the light fixture can be installed.
Finally, use a screwdriver to remove the old light fixture and install the new one.
Feed the electrical wires
When you’re hanging pictures or other decorations on your walls, it’s essential to make sure that you feed the electrical wires through the hole in the drywall first. This will help keep them out of the way and prevent any accidents.
Install the new light fixture.
The first step is to determine what type of light fixture you need. There are various options available, from ceiling fixtures to track lighting. Once you know what you need, you can purchase the light fixture and any necessary supplies.
If any of the wirings is damaged, it will need to be replaced before the new fixture can be installed.
Once the wiring is in good condition, the new fixture can be installed. This may require basic carpentry skills, such as using a drill or saw. Again, read the instructions that come with your new light fixture.
Turn on power to the light fixture.
Once the new fixture is installed, it’s time to test it out. Turn on power to the light fixture at the breaker box by flipping the switch to the “on” position and checking to make sure the light fixture is working correctly.
FAQ:
What size hole for 6 can light?
There is no definitive answer to this question as it depends on the type of light bulb and the fixture it is being used in. However, a general rule is that a 6-inch hole should be large enough for most light bulbs.
How do you measure a can light?
There are a few different ways to do it when it comes to measuring the brightness of a can light. One way is to use a light meter, which will count the number of lumens emitted from the light. Another way is to use a lux meter, which will measure the amount of light received by a surface.
Should I install recessed lighting before or after drywall?
If you’re planning on installing recessed lighting, it’s generally best to do so after the drywall is up. This way, you can avoid any potential damage to the drywall and ensure the lighting is installed correctly.
However, if you’re comfortable working with drywall and are confident you can avoid damaging it, you could install the lighting before putting up the drywall. Just consult with an electrician or other lighting expert to ensure you’re doing it safely and correctly.
What type of saw should I use?
If you have a keyhole saw, that is the best option. A drywall saw will work if you don’t have a keyhole saw. If you don’t have a drywall saw, a jigsaw will work.
How do I use a keyhole saw?
First, make sure that the blade is sharp. Then, hold the saw at a 45-degree angle and cut it into the drywall.
How do I use a drywall saw?
First, make sure that the blade is sharp. Then, hold the saw at a 90-degree angle and cut it into the drywall.
Conclusion
When cutting recessed light holes in drywall, it is essential to use a drill and bit that is the same size as the light’s trim. This will ensure a snug fit and prevent the light from rattling. It is also essential to use a backer board to prevent the drywall from crumbling when cutting the hole.